Stenciled Tile Floors for under $100
- Erika Coleman
- Jan 4, 2022
- 5 min read


After 3 long months of renovating my master bathroom (90% of it completely by myself) I am FINALLY done! This was hands down a penny pinching kind of renovation, but you would never know it!
For what I like to refer to as the 'finale' of my renovation, I had the privilege of collabortating with Cutting Edge Stencils, an amazing company that allows DIYers like myself to transform spaces with paint using their beautiful stencils. I searched through their many designs of tile stencils and found one that I loved, the Tangier stencil.
Believe it or not, this floor transformation took me a total of 18 hours, which I completed over 2 days. And even better yet, it cost me under $100! Surprisingly, floor paint wasn't very expensive, not like cabinet paint is. For that I was very grateful.
To start I cleaned my floors thoroughly with a good vacuum and some tile cleaner. Let everything dry and then tape off all along your baseboards, toilet, kickboard, anywhere you don't want paint getting on it.
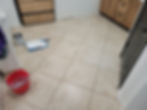
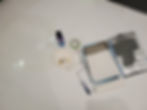
Once your space is prepped get all of your paint supplies ready to go. You DO NOT want to not be able to reach something you need while shuffling around on your wet painted floors. My suggestion is to keep a 2nd paint tray around you can slide with extra supplies on it, like paper towels, brushes, rollers, etc. Here's what I gathered together to get started.
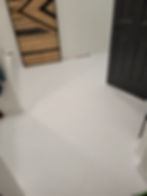
Now that all of the supplies are ready, we can start priming the floors. I used Kilz 2 All Purpose Primer. It is fast drying and works great on tile surfaces. I applied two coats of this, letting it set for an hour in between each coats. *I cannot stress enough the importance of paying attention to your dry times when painting floors. You want everything to cure appropriately for the best, longest lasting results. This is what the floors looked like after 2 coats of primer.

After the primer had set I could start applying the white base coat with the floor paint. I live very close to a Lowes Home Improvement store, so I just bought the Valspar floor paint they had. It was super thick and went on really well. The dry time in between coats, however, says "overnight"... I interpreted this to mean at least 8 hours, which is what I gave it. I threw on the first coat and then went on a nice date night with my husband, and finished the second coat around 11:30pm that night. I was DETERMINED to be able to start stenciling first thing in the morning!
This is the really fun and exciting part! The stencil design I chose does not fit exactly on each tile, so I knew the pattern would be overlapping on the grout lines. That was totally fine and in the end you didn't even notice them.
Here's what you need to do to stencil your floors using a continuous, intertwined pattern like the Tangier Stencil.
Lay your stencil on the center of a tile. I found using a light grip adhesive spray really helped hold the stencil in place and I didn't need to use any tape along the edges. I chose a tile where I could do the entire pattern first (not up against the wall or in a corner) so I could then start building off the pattern. You need one solid outside edge design available to line up the next stencil. Here's what I mean:
2. Apply paint to your foam roller, then roll off the excess on a paper towel (this is another reason I used a second paint tray). You want your foam roller brush to be almost dry. Slowly start rolling the paint over your stencil. It is better to do multiple light coats than a heavy coat to prevent bleeding. To get into the grout lines I used my stencil paint brush and dabbed it until it was visible. Use the same concept though, less is more. Dry the paint brush same as you would the foam roller before applying it to your stencil. Lift the stencil from both sides and pull up.

3. DRY YOUR STENCIL! I cannot stress this enough, take a minute in between each stencil placement and use a blow dryer to dry the front and back sides of your stencil. You definitely do not want to put it down with wet paint on the back side of it.
4. Once your initial stencil is dry you can line up and place your stencil to start the next tile. Continue the process of rolling the paint, drying the roller, and slowly applying the paint over your stencil. Reapply the spray adhesive to the back as needed. It should last you around a dozen tiles before reapplication is really necessary.
5. To create more efficiency when stenciling move from one side to the opposite side so everything is totally dry. Spread yourself out and jump over a tile and back again if needed. This process, although really fun and enjoyable, takes time. So make the most of it!

6. Once all of your tile is stenciled let it sit again for at least 8 more hours before you seal it. I used Rustoleum tile sealant in clear matte on my floors. This takes 24 hours to harden before you can lightly walk on it. The entire process will continue to cure for 7 days, so be gentle with it and do not wash your floors until after this time frame!
Celebrate your success! This looks like it cost a fortune! It's amazing what the #powerofpaint can do to a space! This bathroom renovation took a lot of time, and I'll go more into those details on another post. For now, let's celebrate this cherry on top, these beautiful floors!
This was not the first time I used stencils from #CuttingEdgeStencils. They have such a wide variety to choose from. One of my favorites they offer is their constellation stencil, which I used in my daughter's space-themed closet for my #furnitureflipchallenge. It turned out amazing! I encourage you to check out their most popular stencils too!
Tips and Tricks:
Consider purchasing a second stencil in case you need to get into a tight space or corner. I did not do this, and it would have been helpful around the toilet area (I was not excited about taking the toilet out, which would have made it easier, so I left it in).
Keep a fine, straight edged craft paint brush handy for small touch-ups. It's ok to have imperfect stenciling. In fact, I think it makes it look like more genuine tile. But if it drives you mad to have a little bleeding or a not-so-perfectly lined up corners, by all means, fix what you want!
Keep your 2" angled brush handy when painting and sealing in case little fly-away hairs or lint get loose. They are excellent for grabbing them without ruining your design.
When in doubt, reach out for help! Cutting Edge Stencils has excellent customer service and will guide you in the right direction should you need it! Also, I'm here for you! Feel free to reach out, and make sure you're following along with my stories and posts on Instagram @Erilee.Designs.

Thank you for being here!!! If you are interested in purchasing a stencil or two, be sure to go through my affiliate link here!
Up Next:
A full recap of my master bathroom renovation! Stay tuned!
Love Your Home,
Erika
